If this is your first visit to Homebrew Notes, read THIS first.
Homebrew Notebook Page: Summary Homebrew Note – Making Multiple Yeast Starters in a Pressure Canner
Status: In Testing
Source(s): Mad Fermentationist Post
Contents
Why This is Important and/or Interesting
Liquid yeast is awesome for one primary reason – variety. With numerous producers each having their own selection of strains, you have a lot of liquid yeasts to choose from. This variety enables you to choose a yeast that helps you achieve the precise flavor profile you’re targeting. It gives you flexibility in esters, attenuation, alcohol tolerance, fermenting temp ranges, and more. If you are so inclined (and I think you should be), you can even make your own frozen yeast bank so you always have your favorite liquid yeasts on hand.
That said, if you’re using liquid yeast, you’re almost certainly going to need a starter and starters can be a pain in the ass to make on a one-at-a-time basis. That’s why I, and many other people, create many starters at once by pressure canning them. If you aren’t familiar with pressure canning, it may sound daunting but it really isn’t. You just need to understand the key components of the process and that’s precisely what Homebrew Notes is designed to deliver.
Process Overview (AKA What You’re About to Make)
For these canned starters, I’ve tried to keep it simple so that each canned starter jar plus some bottled water will make a 1 liter starter at a 1.040 gravity. This is a convenient concentration since starter wort should be in the 1.030 – 1.040 range and people will often make starters in sizes of 1 liter increments. If you need a 2 liter starter, simply use two canned starters and double up on the recommended bottled water.
In order to accomplish this, each pint-sized starter will have 4.0 ounces (114 grams) of dry malt extract (DME) plus 8 ounces (240 ml) of water. It can be tap water but if you have filtered water or water without chlorine, that’s ideal. If tap water with chlorine is all you have, don’t sweat it.
By canning a mix of 4.0 oz of DME and 8 ounces of water, you’re making a concentrated, canned wort with a gravity well above the 1.040 target (around 1.0XX actually). Then when it comes time to use the canned wort with some fresh yeast, you’ll pop the cap, pour it into your yeast starter fermentation vessel, add clean water to reach the appropriate gravity and volume, and then add your yeast. You can think of the canned wort you’re about to make as the DIY equivalent of Propper or Northern Brewer’s Fast Pitch.
You should know up front that this process takes a while. Most of the time will not require your hands on involvement but you will need to be in the general area of the pressure canner to monitor things for the first couple of hours. Here’s a quick breakdown of the schedule:
- Setting up your station, creating the jars of starter, and putting them in the pressure canner (30-60 minutes) (Hands on)
- Bringing the pressure canner up to 15 psi and then waiting for the 15 minutes of pressure canning to complete (60-90 minutes) (In the area but very minimal hands on)
- Letting the pressure canner sit and cool to room temperature (6-8 hours) (Entirely hands off – I recommend doing the above after dinner and letting this cool stage happen while you sleep)
This is a lot of time but aside from the hour or so you’ll be actively doing stuff, the rest is hands off time. If you compare that to the 30-60 minutes it takes to make and chill a single yeast starter, you’ll see it’s well worth it. The beauty of this process is that on the day you use these pre-canned starters, it’ll take you 5 minutes to sanitize your gear, add a jar of this starter, add water, and add your yeast.
Now it’s time to get your Items Needed and start the process.
NOTE: This post contains affiliate links. In the event of a sale, I will be awarded a small commission (at no additional cost to you). Don’t worry, I’ll just use the commission to buy more brewing stuff anyway.
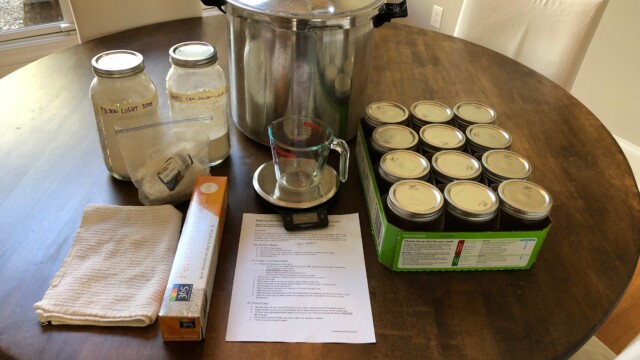
Items Needed
- Pressure Canner
- Dry Malt Extract (Preferably Light DME but Any Will Work)
- Yeast Nutrient
- 10-15 Pint Mason Jars – Including New Rings and Lids
- Small Food Scale
- Hand Towel
- Large Silverware/Soup Spoon
- Plastic Wrap
- Water
- Permanent Marker
Process Gallery
Have a quick look at the gallery photos by clicking on the first image and reading the captions as you click your way through the images. Then read the Process section(s) below for context.


Process: Set Up Your Station
NOTE: DME is extremely sticky and messy so make sure to set up your station as instructed. I promise you don’t want to try it without the towel/scale/plastic wrap set up. You have been warned.
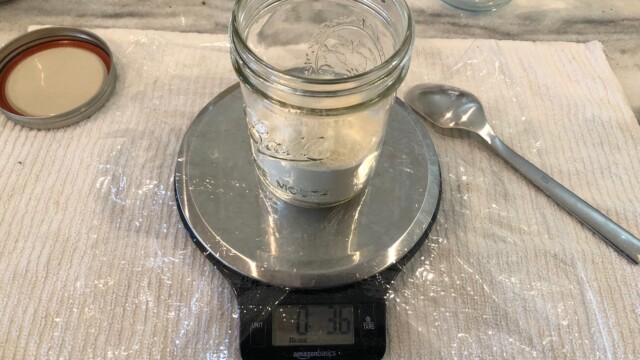
You’ll want to set up your station near your sink so you have easy access to plenty of water. Take the lid off your pressure canner and place it in the sink if it will fit. If it won’t, just place the canner beside the sink. Next to the sink and canner, you’ll need a space of about 3′ x 5′ for this:
- Put down a hand towel.
- Put your scale on top of that towel.
- Tear off a 12” x 12” (or larger) piece of plastic wrap and lay it gently over the scale. If you tuck it around the scale, the plastic will pull down on the scale’s platform and mess up your measurement.
- Remove the lid and ring from a pint Mason jar and place it on top of the scale.
- Turn the scale on and make sure it reads zero with the jar on it. If not, tare the scale to zero.
- Open your DME and put it on your hand towel.
- Put your spoon beside the DME on the towel.
- Open your yeast nutrient and have it nearby.
If you skipped the Photo Gallery above, look at the second picture in it to see most of my station.
Process: Create Jars of Starter Mix
Now that you’re set up, it’s time to fill some jars with wort. Despite your best effort, you’re going to spill a little DME. With it being so light and powdery, it’s unavoidable. Just take your time, use the spoon to scoop out DME, put the spoon of DME inside the lip of the jar, and dump it in gently. It’ll be fine. Below is the process to follow. Repeat it until you can’t fit any more jars in your pressure canner or you run out of DME.
NOTE: You may wonder about sanitation at this point. Don’t worry about it. The pressure canning process is going to resolve that issue for you.
- Scoop 4.0 oz of DME into jar
- Add a pinch of yeast nutrient into jar
- Measure out 8 oz (240 ml) of water & pour it into the jar
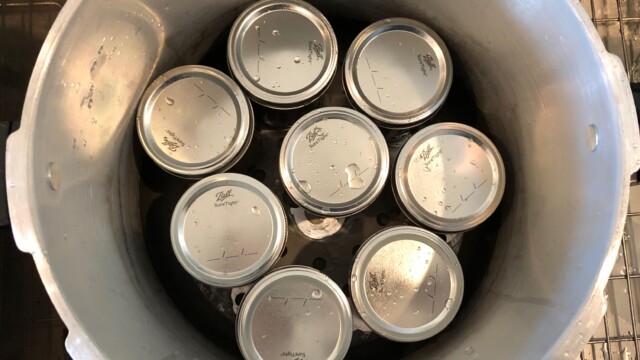
- Seal jar with lid and ring and put jar in pressure cooker (Make sure the lid is snug but don’t over-tighten.)
RECOMMENDED: Now that your canner is full, make note of how many jars your pressure canner will hold. Next time, you’ll know exactly how many jars to bring and how much DME you’ll need (DME = 4.0 oz * your number of jars + a few extra ounces for spillage and overage).
Process: Can Those Jars!
All your jars are just waiting to be pressure canned so let’s get those suckers going.
Add 3-5 inches of water (preferably hot) into the bottom of the canning pot. You need enough that it won’t boil itself dry but you don’t really need more than that. I know it seems odd for those jars on the top tier to have no water around them but trust me, it’s fine.
TIP: If you have hard water (typically from a well), add a few tablespoons of vinegar to the water to prevent mineral build up. If you don’t do it once it’s not the end of the world, but it’s good for maintaining your canner.
Lock the lid on your pressure canner, remove its weight, and turn your burner on high. Now you have some free time to clean up while the heat builds – just keep an eye on it every few minutes. When steam starts coming out of the vent, put the weight back on the vent. Give it more time for the pressure to build and eventually (again, it’ll take a while), the internal pressure will push the lid gauge to 15 PSI. At this point, that weight will start shaking and hissing. If you’re in the area, you’ll hear it. At this point, your significant other will wander into the room and look at you like you’re cooking crystal meth and your pets will either hide or they’ll come to see what you’re about to feed them. Mine always goes the food route.
As soon as the gauge reaches 15 psi, start a timer for 15 minutes. Sustain 15 psi for the full 15 minutes.
After 15 minutes, turn off your stove burner and let the pressure canner cool naturally. Don’t even remove the weight until the pressure gauge shows the pressure is back at zero. You’ll want to be impatient but that’s a bad idea. You have a pressurized container there that could explode if you try to open it. I’ll repeat – DO NOT TRY TO OPEN THE CANNER UNTIL THE PRESSURE IS AT ZERO! IT WILL EXPLODE! I would suggest you go brew a batch or two of beer, grill some ribs, maybe watch a sporting event, and don’t think about the canner. I tend to do this after dinner so I can just let it cool while I snooze.
IMPORTANT: It’s important that you don’t remove the weight before the pressure gauge drops to zero naturally. If you remove it before then, the pressure will escape the canner too quickly. With such a quick decompression and hot jars, you run the risk of cracking jars or the contents coming out of the lids preventing a good seal. Don’t do it. Instead, go read a brewing book or more Homebrew Notes.
If you’re not in bed and you see that the pressure gauge is back at zero, you can remove the weight. Now wait another 10 minutes for any possible remaining pressure to escape that valve where the weight once was. After another 10 minutes, now you can open the canner and take the jars out to cool. You’ll want to use an oven mit unless you have a baseball glove for a hand. Personally, I still say go to bed and unpack the canner tomorrow.
Process: Post-Pressure Starter Check
If you slept or went away while the canner cooled, it’s time for the next step. Confirm that the pressure gauge is at zero. If so, remove the weight and make sure there’s no pressure release. If it’s been 6+ hours of cooling, there shouldn’t be. Now slowly open the lid and gauze into the pot at your beauties. Pull them all out and check each lid individually to make sure its popped in. If you can press the lid and it will pop up and down, it didn’t make a good seal. Unfortunately, this happens every now and then (one jar every 2-3 batches could be considered normal). If you have a jar that’s not fully sealed, leave the lid closed on that ornery, uncooperative jar and put it in your fridge. You’ll need to use it for a starter in the next couple of days because it isn’t shelf stable at room temperature. Might I suggest you use it to start your frozen yeast bank?
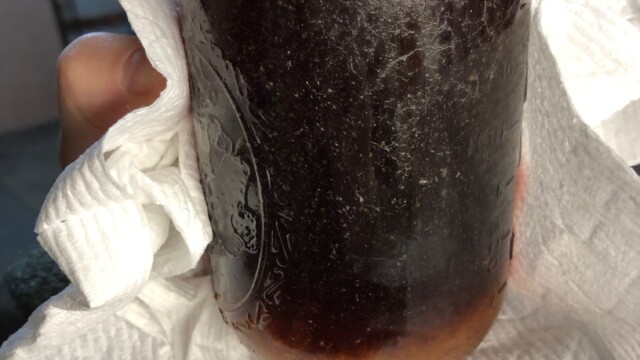
Rinse and wipe down the outside of the jars and lids to clean off any dried on wort. Once the water from the rinse has dried, use a permanent marker to write these on the lid – date canned, “26 oz”, and “1.040”. These are conveniences. When you go to use that canned wort, you can look at the lid and know to add 26 oz of bottled water to reach a 1.040 starter wort gravity. You won’t even have to refer back to the Multiple Yeast Starter Summary Homebrew Note. (You’re welcome.)
All of those jars where the lid is popped in are in good shape and you can put them on a shelf at room temperature for a long, long time. Before you do, remove all of the outer rings but leave the lids in place and popped in. You want to remove the rings because if there’s a sudden release of pressure for any reason (e.g. they get really hot), you want it to pop the lid up instead of exploding the glass.
You just created ready-to-use canned yeast starters.
Process: How to Use a Canned Starter
Using one of your canned starters is actually pretty simple. For the most part, you’re following the latter part of the making a yeast starter process. The main difference is that you’re skipping the actual making of the starter and going straight to the part where you’ll add everything to your starter container.
Items Needed for this Stage
- Canned Starter Wort (1 jar per 1L starter you intend to make)
- Bottled Water (at least 26 oz/760 ml per 1L starter you intend to make)
- Instant Read Thermometer
- Fermentation vessel (growler, flask, jar, etc.)
- Funnel
- Aluminum Foil
- Sanitizer
- Sanitizer Spray Bottle
Let’s discuss the specifics of what you need to do.
IMPORTANT: Everything that touches the liquid wort must be sanitized. The wort is subject to infection and infected wort ruins your beer. Before you let anything touch that liquid (funnel, flask/jar, etc.) spray it with sanitizer.
Sanitize the inside and outer lip/edge of your starter container (jar/flask/growler), your stir bar (if using a stirplate), your funnel, and one side of a piece of aluminum foil (roughly 12″ x 12″). This is most easily done using a spray bottle of sanitizer.
ALTERNATIVE: If you do not have a stirplate and plan to use a growler, large jar, or some other vessel for making your starter, that’s a perfectly acceptable alternative approach. Just follow these processes as outlined ignoring references to stir bars and stirplates.
Keeping your hand on the dry side of the foil, place the center of the wet side on top of your sanitized glass container. Fold the foil around the sides so the foil is flat across the container’s opening and squeeze the foil tight around the sides. You want it to cover the top without falling off but still allow gas to seep out if pressure builds (i.e. no rubber bands to hold it on) (see my starter flask as an example).
NOTE: What follows needs to be done quickly. Don’t spill stuff everywhere trying to do this in five seconds but don’t wander off and leave your container uncovered for 3 minutes either.
Now remove the foil, shake and open your jar of canned wort, and quickly pour the canned wort into the sanitized glass container using the sanitized funnel. Make sure everything from that jar goes into the container. Now pour in bottled water until you have one liter of total volume (canned wort + water). If you don’t have a line that marks one liter on your flask/container, sanitize a measuring cup and then measure out 26 ounces (760 ml) of water. Pour that water into the glass container. That should be a total combined volume of approximately one liter. Shake your packet of yeast to mix its contents. Sanitize your yeast pack and your scissors. Cut/tear the top of the yeast pack open. Pour (“pitch”) the yeast into the container with the starter wort. Cover the container again with the foil.
If using a stirplate, put the flask onto the stirplate so the stir bar is on the magnet and start the plate at a speed where you get a mild vortex. If you are using a growler, jar, or some other container, shake or swirl the container for 30-60 seconds to dissolve oxygen into the wort (the yeast need it). Keep the starter at room temperature for 24-48 hours occasionally shaking it to keep the solution aerated if you’re not using a stirplate (if you are, the stir bar will aerate for you). If you don’t have a stirplate and you’ll be unable to shake it regularly, you’re still better off than not making a starter at all. Just make that initial shake a bit longer – 60+ seconds.
NOTE: Going forward, you can use the lid you just removed from that starter for a lot of things but you can’t use it again for canning wort. The reason is that a used lid is far more likely to fail and pop up than a new one. The seal just isn’t as good. The ring on the other hand, can be reused for as long as you like. So, put those lids with starter markings to use (like for storing grains) but not for another starter.
After 12-24 hours, the wort will start getting cloudy and probably foamy. That additional cloudiness is yeast! That foaminess is fermentation! After 24-48 hours, the yeast will have consumed all of the nutrients and oxygen in the starter. Switch off the stir plate or discontinue shaking and it will form a milky white layer on the bottom of the container as the yeast flocculates. If you put it in the refrigerator (with foil on) to chill for a few hours, it’ll flocculate even faster. If you are not planning on pitching the yeast right away, you’ll definitely want to store it in the refrigerator.
Recommended but not required – If you put your yeast in the fridge, take it out a few hours before you’ll want to use it to allow it to warm to room temperature.
Your starter is now ready to use.
Process: Pitching the Finished Yeast Starter
After brewing and chilling your beer that the starter was created for, pour (“decant”) off most of the clear liquid from the top of your starter, being careful not to disturb the white yeast layer below. You want to leave a layer of liquid wort on top of the yeast that’s about as thick as the layer of compacted yeast on the bottom. If it’s a bit more or bit less, no sweat.
Once the yeast and your freshly brewed wort have reached your pitching temp, rouse the starter yeast into suspension by swirling the remaining starter solution and pitch the yeast slurry into your freshly brewed wort.
You’ve successfully canned multiple yeast starters and put the first yeast starter into action! Now save and/or print the summarized Homebrew Notebook Page for use in the future.
Now that you’ve read this Homebrew Note, let me know if you have a question, recommended improvement, or other thoughts in the comments below. As I mention in About Homebrew Notes, these are living documents and your feedback is appreciated!


